Everest Helicopter Tour: What to Expect 

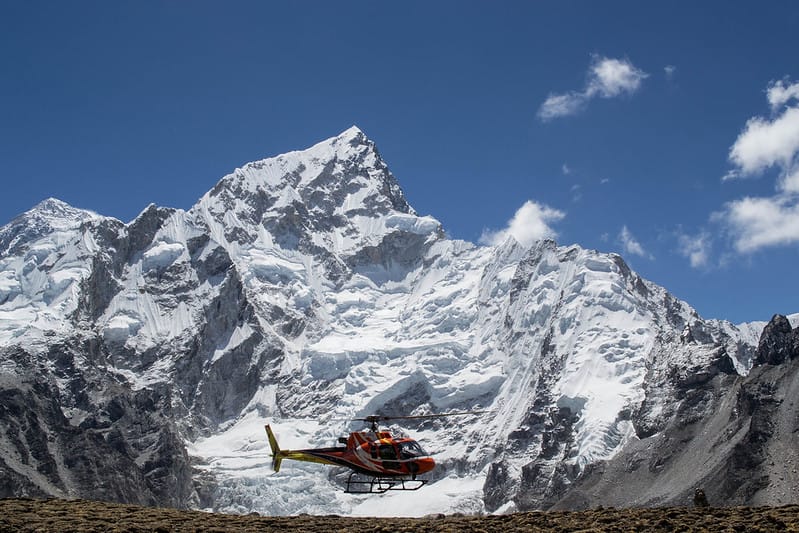
Everest Helicopter tour
image © Daniel Oberhaus/Flickr

Not everyone has two weeks to spare for a trek in the Khumbu. Some people have knees that complain on stairs, some have a tight Nepal itinerary, and some just want to see the world’s highest mountain without a fortnight of hiking. An Everest helicopter tour is the obvious answer. It’s also one of the most misunderstood things you can book in Nepal.

The brochure version is simple: fly up, see Everest, land somewhere spectacular, fly back. The real version has more moving parts. Weather decides a lot of it, landing spots can change, and what you’re promised on paper isn’t always what happens on the day. Here’s what to expect, so you know what you’re paying for.

What the Day Actually Looks Like

Most flights leave Kathmandu early, often around sunrise. There’s a practical reason: Himalayan mornings tend to be clearer, while clouds build as the day warms up. Tend to be, not always. Plenty of mornings are still hazy or cloudy.

From Kathmandu you head northeast, and the landscape changes fast. The city sprawl gives way to terraced hills, then deeper valleys, then snow peaks that seem to stack up on the horizon. Depending on the operator and the day’s conditions, the route can include a stop at Lukla, the mountain airstrip most trekkers use to enter the Everest region. Don’t assume it’s a straight line there and back. Aircraft type, air traffic and weather all influence the route.

Once you’re in the Khumbu, the scenery gets almost absurd. You’ll see the Sagarmatha region’s glacial valleys, and depending on the route, Namche Bazaar, the trail toward Pheriche, and the ridge of Kala Patthar. Everest itself is not always the dominant peak from the air. Nuptse and Lhotse crowd the view, and the summit can look surprisingly modest until someone points it out. Ask your pilot or guide to identify what’s what.

Where Does the Helicopter Land?

This is the question most people ask, and the honest answer is that it depends.

There’s a big difference between flying past Everest Base Camp and landing at it. The camp itself sits on the Khumbu Glacier, and from the air you can often spot the tents in the climbing season. Landing there is a separate matter. Rules, permissions, ground conditions and safety considerations all play a part, and they’ve shifted over the years. Many tours use a nearby high-altitude landing point instead. Kala Patthar and the Gorak Shep area are the ones most often mentioned, and some itineraries include a stop at a viewpoint near Syangboche and the Everest View Hotel.

So a tour marketed as “Everest Base Camp helicopter landing” may not literally put you on the base camp ground. Before you pay, ask exactly where the helicopter is planned to land, how long you’ll get on the ground, and what happens if that spot isn’t usable that day.

Wind, cloud, poor visibility, snow on the ground and pilot judgment can all change the plan. A good operator explains this upfront. A less careful one promises the same perfect experience every day, which no one in the Himalayas can honestly do.

Everest Helicopter Tour Cost

There’s no single price, and any article quoting one number as universal is guessing. What you pay depends on a handful of things.

The biggest is whether you’re in a shared or private flight. In a shared flight, the aircraft cost is split between passengers, so it’s cheaper per person, but you fit around the group’s schedule and other people’s photo habits. A private charter costs more in total but gives you a small group, more flexibility and a more personal itinerary. If you’re a family of four or five, the price gap per person might be smaller than you think, so ask for both quotes.

Season matters too. Peak trekking months are busier, and aircraft and slots are in higher demand. The landing plan can also affect the quote, since a longer or more involved route costs more to operate. Then there are the extras. Some quotes include hotel pickup, permits, breakfast or a return transfer, and others leave them out. Two prices that look far apart may not be covering the same trip.

The practical advice is to ask for a written breakdown: what’s included, what isn’t, and what happens to your money if the flight doesn’t go ahead.

Weather: The Part Nobody Can Promise You

Mountain weather is the wild card. Helicopters in the Himalayas are sensitive to cloud, wind and visibility, and conditions can change within an hour. A sunny Kathmandu morning doesn’t guarantee a clear Khumbu.

If conditions aren’t right, several things can happen. The flight might be delayed to wait for a window. The route might be changed. The landing point might shift somewhere lower or more sheltered. Or it may be postponed or cancelled if the pilot decides it isn’t safe. That last one is frustrating, but it’s the right call, and you’d want a pilot who makes it.

What matters is what your operator offers in that situation. Some will rebook you for another morning, some will refund part or all of the payment, and some have stricter terms. Ask before you book, not after you’re standing at the airport at 5:30 a.m. And if your schedule in Nepal is very tight, leave a spare day. A single-morning window with a flight home right after is asking for trouble.

What the Flight Feels Like

It’s louder than people expect. Helicopter cabins are noisy, and you’ll likely wear headsets to hear the crew. The views are big, wide and hard to photograph well through a window, so don’t spend the entire flight staring at your phone screen. Look with your eyes first.

Time on the ground at a high-altitude landing point is usually short, often a few minutes to a bit longer. It can feel cold and thin in the air even if Kathmandu was warm. Move slowly, drink water, and listen to the crew. You haven’t acclimatized the way a trekker would after several days of walking up, so some people feel lightheaded, especially if they rush around taking photos.

That’s actually one of the biggest differences between flying and trekking, and it leads to the next question.

Helicopter Tour vs. the Everest Base Camp Trek

These two aren’t really competing. They’re different experiences that happen to share a mountain.

Helicopter tourEverest Base Camp Trek
TimeRoughly a morning or half-dayMany days on the trail
EffortMinimal walkingLong, physical days at altitude
PerspectiveAerial and panoramicGround-level, village to village
Weather riskHigh, can affect the flightAlso present, but you have more days to adapt
Best forShort schedules, limited mobilityPeople who want the full journey

The Everest Base Camp Trek gives you the villages, the tea houses, the yak trains, and the slow buildup as the mountains get closer each day. You earn the views. A helicopter gives you the scale in one dramatic hit, and that’s a legitimate reason to choose it. Time, fitness, budget and what you want out of the trip should decide it, not pride.

And the Everest 3 High Pass Trek?
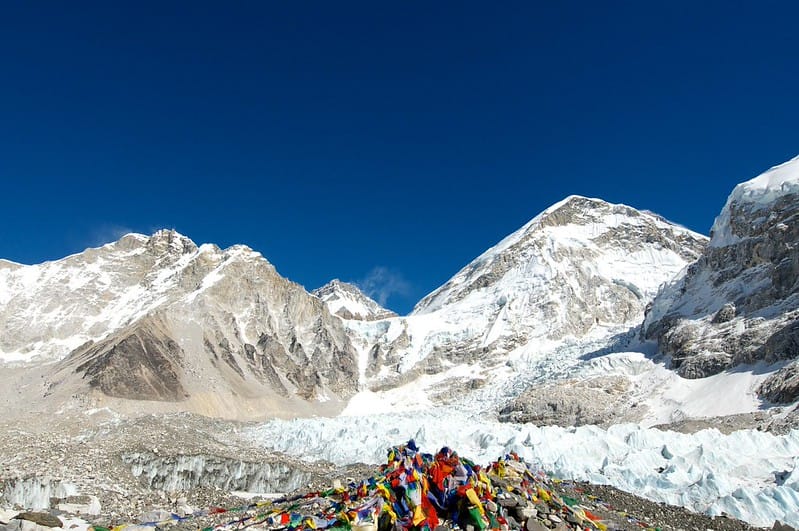
Everest base camp
image © Takuya Photogr/Flickr

If the Base Camp trek sounds like a lot, the Everest 3 High Pass Trek is a step above. It crosses three high mountain passes in the Khumbu, loops through remote valleys, and usually takes longer than the standard Base Camp route. You’re dealing with steep climbs, cold, altitude and long walking days, plus rest days for acclimatization.

It has almost nothing in common with a helicopter flight, which is the point. One gives you a taste of the region in the morning. The other asks for a couple of weeks, decent fitness and serious preparation, and gives you a much deeper look at the Khumbu in return. Some travelers do both in different trips, and they don’t feel like the same place.

Choosing an Operator

Since the flight itself is out of your hands, the operator is what you can control. Ask direct questions and expect clear answers:

  • What aircraft will be used, and how many passengers does it carry?
  • Where exactly is the planned landing, and what’s the backup?
  • What’s the weather cancellation and refund policy?
  • What’s included in the price, and what isn’t?
  • What are the emergency procedures, and is oxygen carried?
  • Is insurance required or recommended?

Travelers researching Himalayan flights and treks will run into a range of Nepali companies, and Adventure Great Himalaya is one name you may come across. Whoever you compare, judge them on how clearly and honestly they answer those questions, not on how polished the website is.

What to Bring

Keep it simple. A warm layer is the big one, since it’s noticeably colder at a high-altitude landing point than in Kathmandu. Add sunglasses, sunscreen, water, your phone or camera, any personal medication, and your passport or ID if the operator asks for it. Comfortable shoes with decent grip help if you’re stepping onto uneven or icy ground. That’s about it.

Before You Book

An Everest helicopter tour isn’t just a photo of a mountain. It’s a weather-dependent flight with a landing plan that can change, a price that hides variables, and an experience that’s genuinely different from walking the trail. If you’re short on time, it’s a great way to see the Himalayas. If you want the slow, physical version, the Everest Base Camp Trek or the Everest 3 High Pass Trek is a different kind of trip altogether.

Whatever you choose, get the itinerary, landing location, total cost, weather policy and backup plan confirmed in writing first.

Quick Answers to Common Questions

Can a helicopter land at Everest Base Camp?
Not always. Flying over or near it is common, but landing at the camp itself depends on rules, conditions and operator plans. Many tours land at a nearby viewpoint like Kala Patthar instead.

How long does an Everest helicopter tour take?
It varies with the route, any stops, and waiting time. Ask your operator for the full timeline rather than trusting a single number.

What if the flight is cancelled for weather?
That comes down to the operator’s policy. Get the rebooking and refund terms in writing before you pay.

Is it safe for first-timers?
You don’t need trekking experience, but you do need a properly run commercial service and a willingness to follow crew instructions. Safety comes down to aviation operations and conditions, not your fitness.

Is it better than trekking to Base Camp?
Neither is better. One is a short aerial view, the other a multi-day journey.
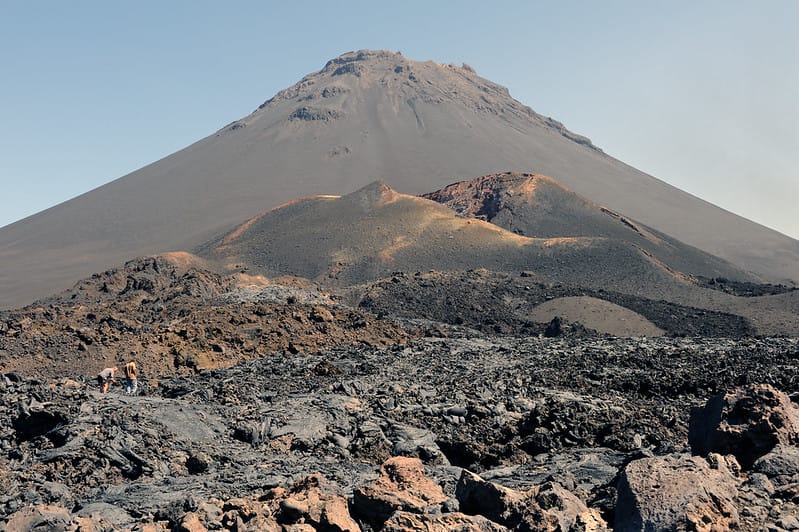
Pico do Fogo Lava Fields, Cape Verde

Rising straight out of the Atlantic, the island of Fogo is essentially a single volcano. Its name means “fire” in Portuguese, and it has earned it. At the top of the island, inside a vast collapsed crater, lies one of the strangest inhabited landscapes in Africa: the Pico do Fogo lava fields, a plain of black, twisted rock where people still grow grapes, make wine and rebuild their homes on top of the flows that destroyed the previous ones.

Pico do Fogo, Cape Verde
photo by michael-travelinsider/Flickr

The crater floor is called Chã das Caldeiras, the “plain of the calderas”, and it sits at roughly 1,700 metres, making it the highest settlement in Cape Verde. On one side it is enclosed by the Bordeira, a curving cliff wall up to a kilometre high. In the middle stands the cone of Pico do Fogo itself, 2,829 metres tall, the highest point of the country. Everything in between is lava: some of it centuries old and softened by ash and vines, some of it barely ten years old and still sharp enough to cut a pair of boots.

A crater that keeps refilling

The caldera formed when the summit of an older, larger volcano collapsed, possibly sliding into the sea on the eastern side of the island. The new cone of Pico do Fogo then grew inside the hollow, and every eruption since has poured fresh lava across the crater floor, where it pools against the Bordeira. The result is a patchwork of flows of different ages and textures: smooth, ropy pahoehoe in some places, jagged clinker-like aa in others, cinder cones, fissures and small craters scattered across a plain of roughly 67 square kilometres, all protected as part of the Parque Natural do Fogo.

Since settlers moved into the crater in the 19th century, three eruptions have reshaped it: in 1951, 1995 and 2014–2015. The 1995 event built a new side vent, known as Pico Pequeno, at the foot of the main cone. The most recent eruption began on 23 November 2014 and lasted until 8 February 2015. Its fast-moving flows buried about three quarters of the buildings in the villages of Portela and Bangaeira and the small hamlet of Ilhéu de Losna, along with the wine cooperative, the brand-new park headquarters, farmland and the only road into the crater. Roughly a thousand people were evacuated.

What makes the place remarkable is what happened next. The government offered housing elsewhere on the island, but the crater was where these families had their fields, and many came back. Today new houses stand directly on the 2014 lava, the road has been cut through the flows again, and walking between the buildings you can still see roofs and walls poking out of the black rock like the remains of a shipwreck.

Wine, apples and a French count

It seems impossible that anything could grow here, yet the volcanic ash holds moisture from the mist that drifts over the Bordeira, and the crater has long been one of the most productive farming areas of Fogo. Vines are planted in shallow pits dug into the ash, each protected by a low ring of stones. Beans, maize, quince, pomegranates and apples grow alongside them. The local wine, sold simply as Vinho do Fogo or under the name of the rebuilt cooperative, is red, white or sweet passito-style, and tasting it inside the crater is part of the experience.

The people of Chã das Caldeiras are also a curiosity in themselves. A surprising number have fair hair and light eyes, and many trace their family tree back to a 19th-century French nobleman, the Count of Montrond, who settled on the island, introduced vines and fathered an impressive number of children. The surname and the features have been handed down ever since.

Climbing the volcano

Most visitors spend at least one night in the crater, in one of the small guesthouses that have reopened since the eruption, and set off before dawn to climb Pico do Fogo. The ascent is steep, loose and unshaded, climbing more than 1,100 metres from the crater floor, and usually takes three to four hours with a local guide, which is strongly recommended. From the rim the view drops into the summit crater, still steaming in places, and on clear days reaches the neighbouring island of Brava. The descent is the fun part: a long, fast run straight down a slope of fine black scree, done in a fraction of the time it took to go up.

Shorter options include the walk to Pico Pequeno and the 2014 vents, where the lava still shows its shape as it flowed, or a hike along the Bordeira rim for a full view of the caldera from above.

When to go and how to get there

The drier months from November to June are the best time for hiking, with clearer skies and cooler mornings; between December and February the harmattan wind can bring Saharan dust and a hazy horizon. The short rainy season, roughly August to October, turns the lower slopes green but makes trails and roads less predictable. At 1,700 metres nights can be cold at any time of year, so a warm layer is essential.

Fogo is reached by domestic flight or ferry from Praia, on the island of Santiago, to the colourful colonial town of São Filipe. From there, shared minibuses known as aluguers or private taxis climb to the crater in about an hour and a half, the road winding up through small villages before cresting the Bordeira and dropping suddenly into the black plain. For travellers exploring the wider volcanic world of Macaronesia, the same fiery geology shapes the Canary Islands and the Azores, but nowhere else do people live quite so literally inside the volcano.

Arrive in late afternoon, when the low sun turns the lava from black to deep bronze and the peak throws its shadow across the crater, and it becomes clear why the families of Chã das Caldeiras keep coming back.

How to Plan a Realistic Road Trip Using Maps, Driving Distance, and Travel Time

How to Plan a Realistic Road Trip Using Maps, Driving Distance, and Travel Time

A road trip can look straightforward when viewed on a map. Choose a destination, add a few stops, check the estimated driving time, and start planning the day. In practice, however, a five-hour route can easily take much longer once fuel stops, meals, traffic, parking, road conditions, and rest breaks are included.

Realistic road trip planning requires more than checking how many miles separate two places. A good plan combines road distance, expected driving time, daily limits, stop durations, and some extra time for delays. 

Thinking about these details before leaving can make each driving day easier to manage and reduce the risk of creating an itinerary that feels rushed.

Start With the Full Route Before Planning Each Day

Before booking activities or deciding when to arrive at a hotel, map the complete route. Seeing the full trip first helps you understand how the different destinations connect and whether your planned stops make sense geographically.

A route that appears simple at first may include longer detours, slower roads, or sections that require more time than expected.

Plot Every Major Stop

Enter your starting point, overnight locations, important attractions, and final destination into your preferred map or navigation tool. Doing this before dividing the trip into individual days gives you a clearer picture of the total distance.

When checking the distance between two locations, focus on actual driving distance rather than straight-line distance. Two towns may look close together on a map but require a much longer drive because of mountains, rivers, limited crossings, road layouts, or other geographic barriers.

Compare More Than One Route

The shortest route is not automatically the best choice. A slightly longer route may use better roads, avoid heavy urban traffic, or offer more places to stop.

When comparing routes, check:

  • Total driving distance
  • Estimated travel time
  • Toll roads
  • Ferry crossings
  • Road type
  • Construction areas
  • Seasonal closures
  • Fuel and rest opportunities

Looking at these factors can prevent you from choosing a route simply because it has fewer miles.

Turn Driving Time Into a Realistic Travel Schedule

The estimated time shown by a map is usually the time spent driving under expected road conditions. It does not represent every minute between leaving one place and reaching the next.

That difference matters when you are planning hotel check-ins, restaurant bookings, tours, or other activities with fixed times.

Add Time for Normal Stops

Suppose your map shows a five-hour drive. Scheduling an activity exactly five hours after departure leaves no room for breaks or delays.

Instead, calculate the full travel block.

A simple approach is:

Total travel time = driving estimate + breaks + meals + fuel stops + parking time + extra buffer

For example, a five-hour drive might include:

  • 30 minutes for lunch
  • Two 15-minute rest stops
  • 15 minutes for fuel
  • 30 minutes for traffic, parking, or navigation delays

That turns a five-hour driving estimate into a travel block of around six hours and 45 minutes.

The exact amount of extra time will vary, but the principle stays the same: do not treat driving time as total trip time.

Consider When You Will Be Driving

Time of day can have a major effect on a route. Driving through a large city during a busy commuting period may take longer than using the same road at a quieter time.

Check whether your route passes through major cities, business districts, popular tourist areas, border crossings, or roads known for congestion. If possible, plan the timing of those sections carefully.

Set a Daily Driving Limit That Actually Works

It is easy to create an ambitious itinerary when looking at the entire trip from home. Once you are several hours into a driving day, however, fatigue can make even the final hour feel demanding.

A realistic plan should consider how long the driver can stay focused comfortably, not simply how far the vehicle can travel.

Think About Who Will Be Driving

If one person will handle all the driving, daily distances may need to be shorter. If two or more people can safely share driving duties, longer days may be easier to manage.

Even with multiple drivers, regular breaks still matter. Getting out of the car, walking for a few minutes, eating, drinking water, and resting can help break up long periods behind the wheel.

Treat Difficult Roads Differently

One hundred miles on an open highway can feel very different from the same distance on narrow mountain roads or busy city streets.

Reduce your planned mileage when a route includes:

  • Steep or winding roads
  • Heavy city traffic
  • Frequent intersections
  • Poor road conditions
  • Long sections after dark
  • Unfamiliar rural roads
  • Difficult weather conditions

Road difficulty should be part of the planning process, not something considered only after you start driving.

Plan Stops Without Overloading the Day

Road trips often become unrealistic because too many attractions are added between destinations. A map may show that three stops are technically possible, but that does not mean they will fit comfortably into one day.

Give each stop a realistic amount of time and include the extra minutes required to leave the highway, park, walk, and return to the route.

Separate Essential and Optional Stops

Create two simple categories for attractions.

  • Essential stops are the places you genuinely want to visit and would be disappointed to miss.
  • Optional stops are places you can visit if the day is running smoothly.

This approach gives the schedule flexibility. If traffic adds an hour to the drive, you can skip an optional stop instead of rushing every remaining activity.

Avoid Booking Too Many Fixed Times

Several timed reservations on the same driving day can create unnecessary pressure. A delayed lunch reservation can affect an afternoon tour, which may then affect dinner or hotel arrival.

Where possible, keep some parts of the day flexible. If you have one important timed activity, build enough spare time before it so a normal delay does not cause a problem.

Check the Route Again Before You Leave

A road trip planned several weeks earlier may need adjustments by the time departure day arrives. Construction, weather, closures, local events, and other conditions can affect both routes and travel times.

Review each day’s route shortly before driving rather than relying entirely on the original plan.

Review Traffic, Weather, and Road Conditions

Check the weather forecast and current road conditions for the areas you will travel through. Pay particular attention to mountain routes, remote regions, areas affected by storms, and roads that may have seasonal restrictions.

If the conditions look difficult, consider adjusting departure time, changing the route, reducing the day’s stops, or delaying a non-essential section.

Prepare for Weak Mobile Coverage

Navigation apps are useful, but mobile coverage can become unreliable in remote areas. Saving offline maps before departure can help if your phone temporarily loses service.

It is also useful to know the names of major roads, towns, and planned stopping points. That basic awareness makes it easier to understand where you are without depending entirely on live navigation.

Recalculate Whenever the Plan Changes

Adding a quick stop may seem harmless, but even a small detour can change the day more than expected. Twenty minutes off the main road may become much longer once you include the return drive, parking, and time spent at the location.

Whenever you add another destination, recalculate the full day’s route.

The same applies when changing hotels or deciding to stay overnight somewhere different. Road trip schedules are connected, so one change can affect the following day’s distance and timing.

Conclusion: Build the Schedule Around Real Travel Time

Planning a realistic road trip means looking beyond the route shown on a map. Driving distance tells you how far you need to travel, while estimated driving time provides a useful starting point. Neither one tells you exactly how long the entire day will take.

Add time for meals, fuel, rest stops, traffic, parking, weather, and unexpected delays. Set daily driving limits based on the people in the car and the type of roads ahead. Keep optional stops flexible, and check conditions again before each major driving day.

Wae Rebo, Indonesia

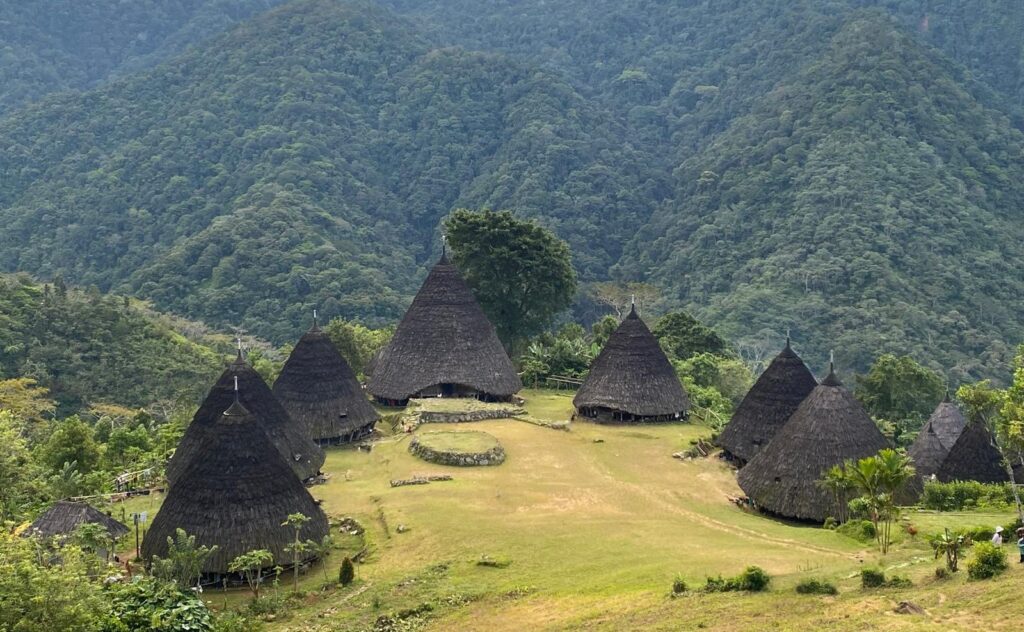
Seven cone-roofed houses sit on a ridge eleven hundred meters up in the Flores highlands, wrapped in cloud through most of the year and reachable only by a footpath through the forest. This is Wae Rebo, a village that has held onto one of the last complete examples of a building style once common across the island, along with a way of life that hasn’t bent much for the visitors who now make the climb to see it.

A Village Built in Cones

The houses are called mbaru niang, and there is nothing else in Indonesia quite like them. Bamboo and rattan frames rise into a cone, wrapped almost to the ground in a thick skirt of lontar palm thatch, so that from a distance a house looks less like a building than a haystack with a door. Inside, each one splits into five levels, and the split is functional rather than decorative: the ground floor, lutur, is where families sleep and eat; the second, lobo, holds everyday food and goods; the third, lentar, is set aside for next season’s seed; the fourth, lempa rae, keeps an emergency store against drought; and the fifth and smallest, hekang kode, is reserved for offerings to the ancestors. No two houses are quite the same size — the Niang Gendang, the ceremonial house at the center of the circle, shelters eight families on its own, while the other six each hold about six.

Wae Rebo
photo by M. Gini

The roofs get rethatched every so often, but the frames are original enough that Wae Rebo is generally regarded as the last village on Flores where this architecture survives intact, rather than as a single restored example among modern buildings. That distinction earned it a Top Award of Excellence from UNESCO in 2012, recognizing the community for rebuilding the houses without losing the methods that made them work in the first place.

How the Village Came to Be

Local accounts trace the village to a man named Empu Maro, said to have led his family away from the Minangkabau region of Sumatra after a vision pointed him toward the mountains of Flores. The settlement he founded was occupied for nineteen generations, abandoned at some point, then rebuilt and reoccupied in 1920 — the houses standing today are essentially that reconstruction, kept up ever since by descendants of the same clan. Roughly forty-four families trace their line back to Empu Maro, though only a fraction live in Wae Rebo full time; many keep houses down in the valley and rotate up to the village for the growing season or for ceremonies. Most residents are Catholic, but the older customs run alongside that faith rather than under it — the Niang Gendang still stores the drums and gongs used in ritual, and a welcome ceremony is performed for every visitor who stays the night. Below the ridge, terraced plots supply cassava and maize for the village itself, with coffee, vanilla and cinnamon grown as cash crops and carried down the mountain to sell.

Best Time to Visit

The dry season, roughly May through October, is the easier window: the trail firms up, the clouds lift more often, and the view back down the valley actually clears. Outside those months, rain turns sections of the path to mud and can close in the mountain for days at a time. Even in the dry months, nights at 1,200 meters get cold enough that a warm layer matters more than most people pack for; days can be humid on the walk up and sharply cooler after dark. Weekday visits are noticeably quieter than weekends, when group tours from Labuan Bajo tend to cluster.

Getting to Wae Rebo

There’s no direct route. Getting to Wae Rebo means flying into Komodo International Airport at Labuan Bajo, then driving four to five hours over a rough mountain road to Denge, the last village with vehicle access. From there it’s a walk of about ten kilometers round trip, climbing roughly 750 meters through forest on a path that’s cobbled in places and takes most visitors somewhere between three and five hours each way. There’s no booking system — arrivals are handled first-come, first-served by the village cooperative, so an early start from Denge is worth more than a reservation. An overnight stay with meals and the welcome ritual runs around 325,000 rupiah per person; a day visit without staying costs less, and a guide can be hired on-site for those who want one, though the trail itself is hard to lose. Electricity runs on a generator for a few hours each evening, there’s no mobile signal at all, and the sleeping arrangement is a shared mat on the floor of one of the houses — which, after the climb, tends to be exactly enough.

What makes the ten kilometers worth it isn’t really the view, though the ridge has one. It’s that the houses, the ceremonies and the farming below them are still running as one working system rather than staged for the people who come to look, a rarer thing on Flores, and in Indonesia generally, than it used to be. Travelers curious about the country’s other volcanic and cultural landmarks can also see Indonesia’s spectacular Gunung Bromo, or, if fascinated by, letàs say “unconventional” places, browse the wider list of unusual places around the world.

How Frequent Flyers Cut Out Arrival Fatigue at Busy International Hubs

Stepping off an eight-hour flight can feel like walking into a fog.

Your eyes are dry, your legs feel heavy, and your body clock is completely out of sync. After sitting through customs lines and waiting at the luggage carousel, the last thing you want is another battle just to get to your hotel.

Travel experts call this arrival fatigue. It happens when bad cabin air, time zone changes, and airport stress pile up all at once.

Casual tourists often treat the journey from the airport to their bed as an afterthought. But seasoned business travelers and frequent flyers know better. They treat arrival as a skill.

Here is how experienced flyers skip the post-flight crash and land ready for action.

1. They Reset Their Clocks Before Takeoff

Beating jet lag starts in the air, not on the ground.

Frequent flyers change their watch and phone time to their destination’s time zone the minute they board. If it is nighttime where they are going, they put on eye masks and sleep—even if it is midday where they took off.

They also drink plenty of still water. Cabin air has less humidity than the Sahara Desert. Dehydration makes tired muscles ache more and worsens headaches. Staying away from alcohol and heavy plane food keeps your energy steady until you land.

2. They Plan the Terminal Walk in Advance

Huge international airports like London Heathrow, JFK, or Dubai can feel like small cities. A walk from the arrival gate to passport control can take twenty minutes on its own.

Smart travelers do three things to cut down terminal friction:

  • They pack light: If you can travel carry-on only, you save thirty to forty-five minutes at baggage claim.
  • They know their terminal: Knowing which terminal you land in helps you walk with a purpose rather than wandering around looking for signs.
  • They use electronic gates: Having your passport out and ready saves precious minutes in border lines.

3. They Never Wait in the Curbside Chaos

The most exhausting part of an international flight is often the first twenty minutes outside the terminal doors.

Stepping out into the cold wind or rain, dragging heavy bags, and trying to hail a ride on an app is a recipe for frustration. Phone batteries run low, app pickup zones are often hard to find, and local taxi lines can snake around the block.

Frequent flyers take control of this moment ahead of time. Instead of gambling on an app ride, booking a dedicated Heathrow chauffeur service takes away all the guesswork.

When your flight lands, an airport chauffeur is already parked and waiting inside the arrivals hall with a name board. They take your bags, lead you straight to a clean, quiet car, and handle the road traffic while you relax.

4. They Use the Drive as a Decompression Zone

Once you are on your ride, what you do with the next forty-five minutes matters.

If you jump straight onto your laptop while stuck in stop-and-go traffic, your headache will only get worse. Frequent flyers use this window as a mobile buffer zone.

Having a private, reliable chauffeur service in London gives executives a quiet space with climate control, soft seats, and bottled water. You can close your eyes for twenty minutes, charge your devices, or take a private call in total comfort. By the time you reach Mayfair, Canary Wharf, or your hotel, you feel human again.

5. They Avoid the “Midday Nap Trap”

When you finally arrive at your hotel, the soft bed looks tempting.

Falling asleep at 2:00 PM is the biggest mistake you can make. It guarantees you will wake up wide awake at 3:00 AM, wrecking your schedule for the rest of the week.

Seasoned flyers follow two rules:

  • Get natural sunlight: Walk outside for twenty minutes. Sunlight tells your brain to stop producing melatonin, which keeps you awake.
  • Stay awake until 9:30 PM: Take a warm shower, unpack your clothes, eat a light dinner, and push through until evening. When you finally sleep, your body will lock into the local time zone.

The Big Takeaway

Flying thousands of miles across time zones will always take energy out of you.

The secret to smart travel is removing points of stress along the way. When you plan your sleep, move swiftly through the terminal, and arrange your ground travel before you leave home, you arrive calm and ready for the day ahead.

Best-Preserved Dinosaurs Fossils, World

Most dinosaur skeletons on display in museums are reconstructions: a handful of original bones surrounded by plaster casts and educated guesswork. A genuinely complete specimen is rare enough that palaeontologists give it a nickname the moment it comes out of the ground. A handful of these fossils are so well preserved that they have rewritten what science knows about how dinosaurs lived, aged, fought and died, and a few even preserved skin, organs or feathers alongside the bone.

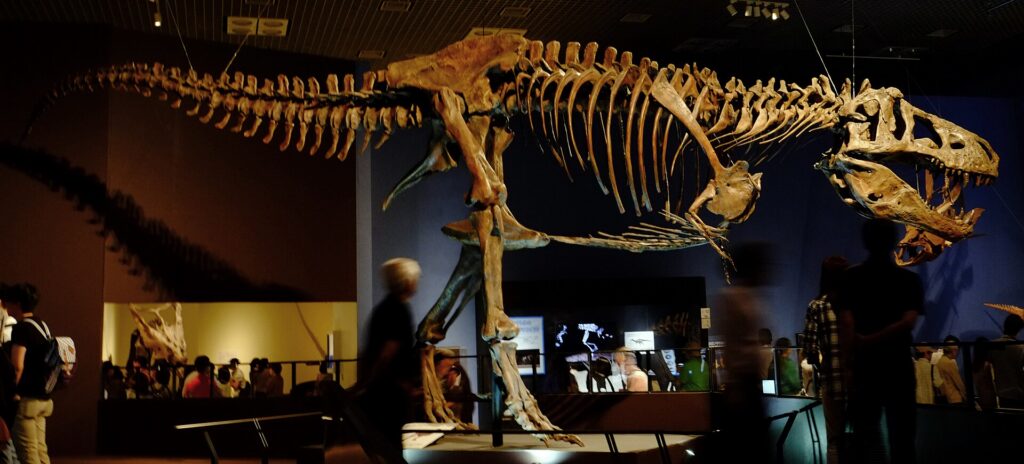
Nowhere is this more true than for Tyrannosaurus rex. Several specimens in particular, Sue, Stan, Trix, Scotty and Wankel are considered among the most complete predatory dinosaur skeletons ever unearthed, and all five still draw the numbers scientists use to judge every new fossil discovery.

Sue, Stan, Trix, Scotty and Wankel: the Most Complete T. Rex Fossils

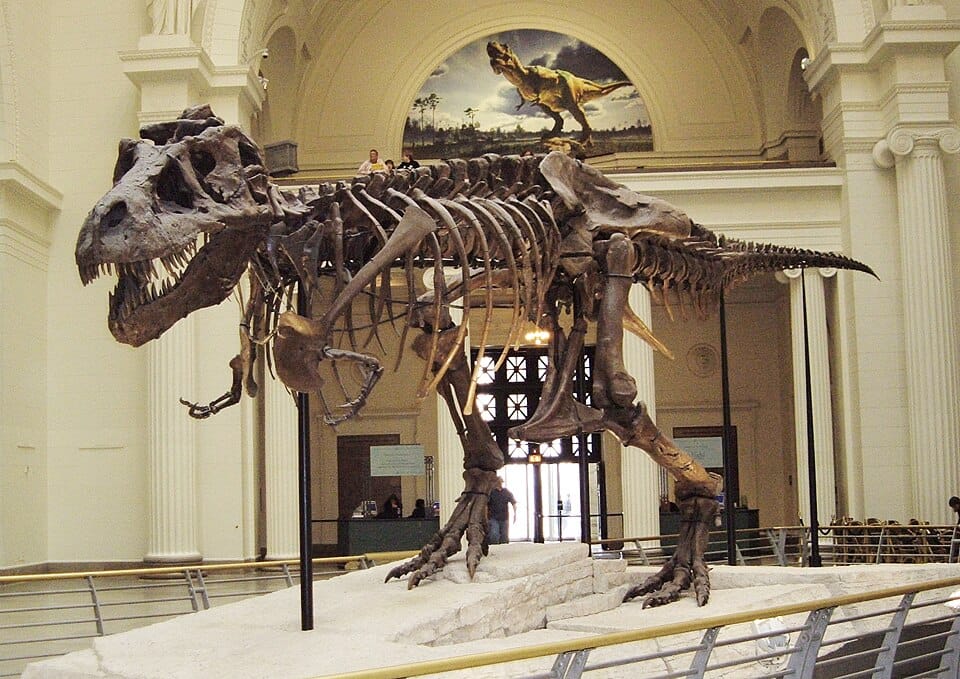
Sue is the benchmark against which every other Tyrannosaurus rex is measured. Discovered in 1990 by fossil hunter Sue Hendrickson near Faith, in the Hell Creek Formation of South Dakota, the skeleton is roughly 90 percent complete, with 250 of the animal’s estimated 380 bones recovered. Sue lived around 67 million years ago and died at about 28, an old age for a T. rex, and analysis of her bones even revealed an adolescent growth spurt of up to 4.5 pounds a day. She has been on permanent display at the Field Museum in Chicago since 2000, now housed in the museum’s Griffin Halls. Sue herself was sold at a Sotheby’s auction in 1997 for $8,362,500, a record at the time, to a consortium led by the Field Museum and backed by Disney and McDonald’s. Sue, and several other landmark fossils on this list, were all found in the same corner of South Dakota.

Sue T-Rex
Michael Gray from Wantagh NY, USA, CC BY-SA 2.0, via Wikimedia Commons

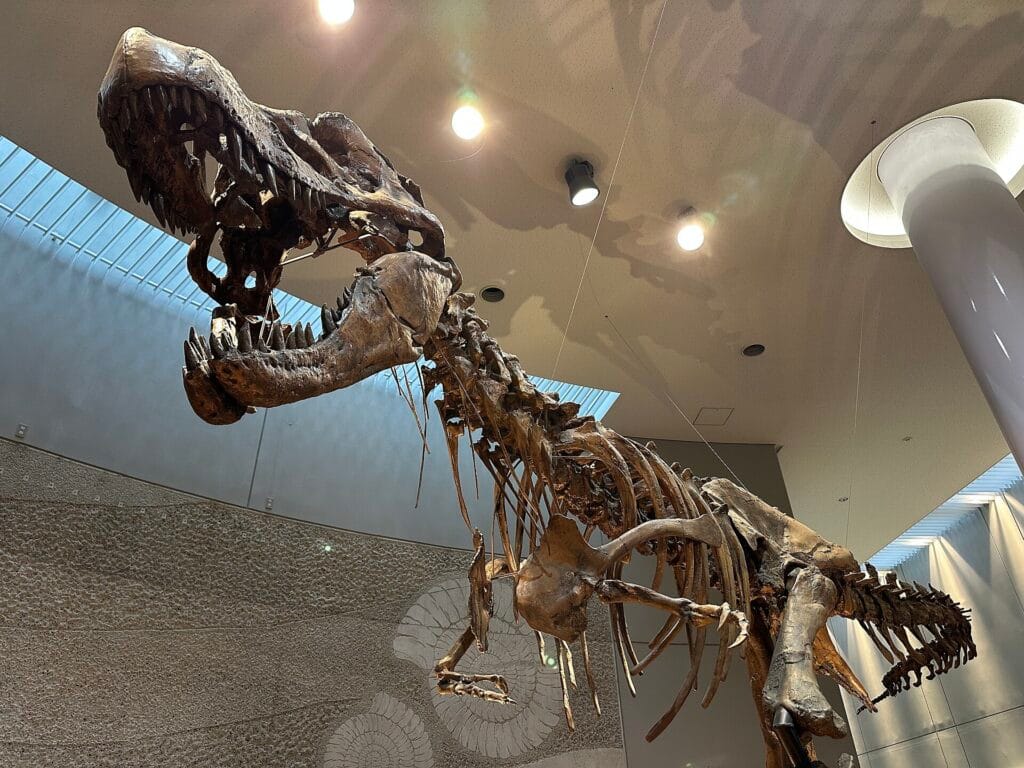
Stan is Sue’s closest rival, and arguably her more dramatic counterpart. Found in 1987 by amateur palaeontologist Stan Sacrison and excavated by the Black Hills Institute from the same Hell Creek Formation in South Dakota, the skeleton is about 65 percent original bone, according to the institute that prepared it. Stan’s skull and vertebrae show a striking record of violence: healed bite marks, a punctured skull and a broken, fused neck bone, evidence of confrontations with other tyrannosaurs. In 2020, Stan sold at auction for $31.8 million, the highest price ever paid for a fossil, and after two years in storage he became the centrepiece of the Natural History Museum Abu Dhabi, which opened on Saadiyat Island in 2025.

Stan T-Rex
Yinan Chen, Public Domain, via Wikimedia Commons

Wankel Rex, better known today as the Nation’s T. rex, is one of the most complete tyrannosaur skeletons ever found: roughly 80 to 85 percent of the skeleton was recovered, skull included. It was discovered in 1988 by rancher Kathy Wankel on federal land near the Fort Peck Reservoir in eastern Montana, then excavated in 1989-90 by a team led by palaeontologist Jack Horner. Because it turned up on land managed by the U.S. Army Corps of Engineers, the fossil is technically government property rather than a museum’s own specimen; it spent over two decades on display at the Museum of the Rockies in Bozeman before the Smithsonian secured a 50-year loan and made it the centrepiece of its fossil hall in Washington, D.C., where it has been on display since 2019. It also holds a research distinction: it was the first T. rex skeleton found with a complete forelimb, giving scientists their clearest look yet at just how small the animal’s arms really were. Today it anchors the Smithsonian’s Dinosaurs and Fossils hall.

Wankel Rex
ノボホショコロトソ, CC BY-SA 4.0, via Wikimedia Commons

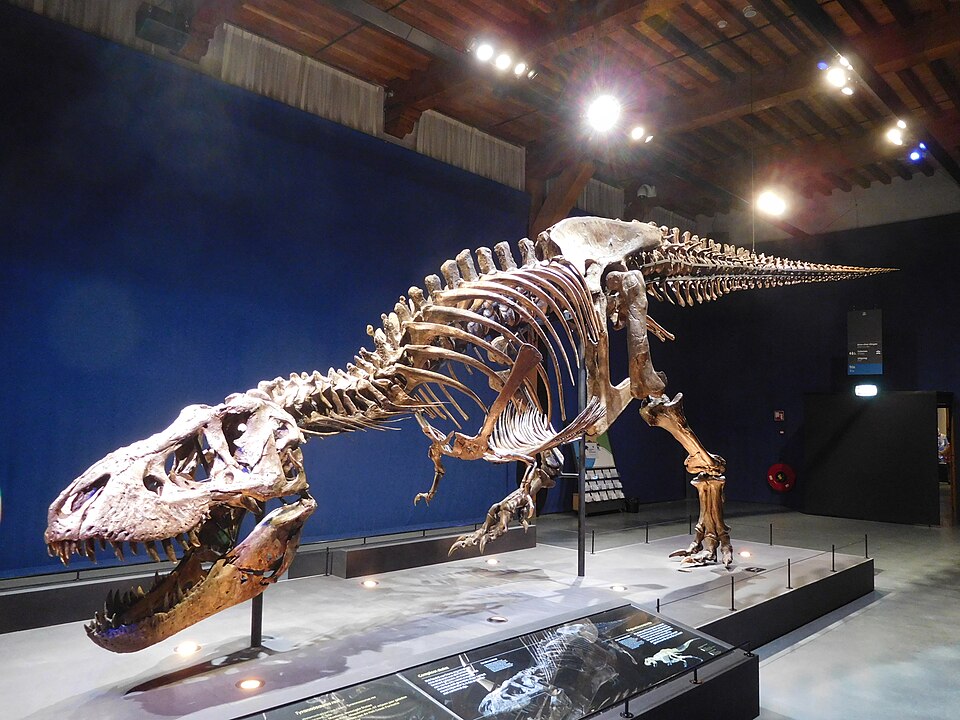
A fourthT. rex, Trix, deserves a mention alongside them. Unearthed in 2013 in Montana and roughly 78 to 80 percent complete by bone volume, Trix is the fourth most complete T. rex skeleton known and, at over 30 years old at death, possibly the oldest. Her bones tell a story of a hard life, including healed rib fractures and jaw infections. Trix now lives permanently at the Naturalis Biodiversity Center in Leiden, Netherlands.

Trix T-Rex
Rique, CC BY-SA 4.0, via Wikimedia Commons

Scotty, found in 1991 in Saskatchewan but not fully excavated and studied for over two decades, is roughly 65 percent complete and holds a different record: at an estimated 19,500 pounds, he is the heaviest T. rex ever weighed, edging out Sue by around 900 pounds. Scotty lived some 66 to 68 million years ago and is now the star attraction of the Royal Saskatchewan Museum in Regina, Canada.

Scotty T-Rex
★Kumiko★, CC BY-SA 2.0, via Wikimedia Commons

Sophie, Big John and the Dueling Dinosaurs

Tyrannosaurus rex is not the only dinosaur with a near-complete skeleton to its name.

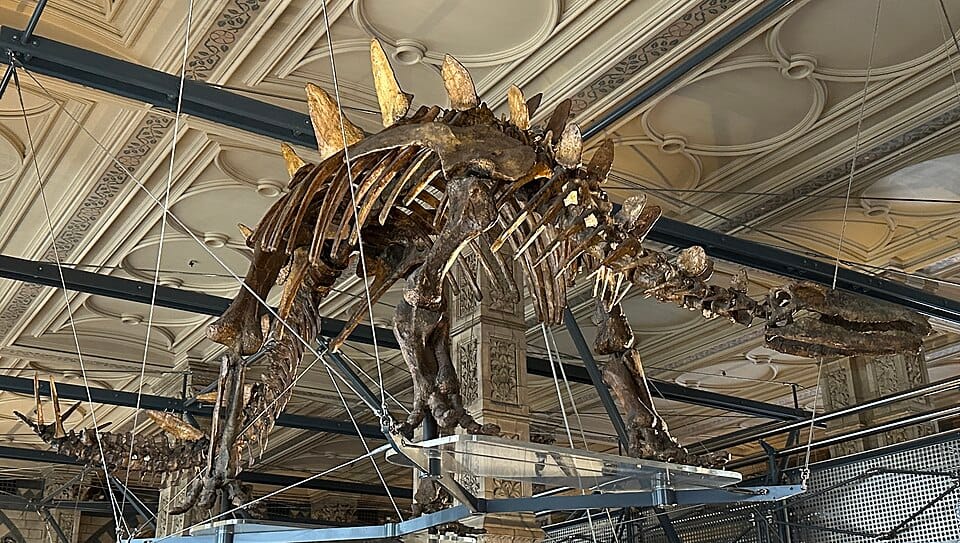
Sophie, a Stegosaurus unveiled at London’s Natural History Museum in 2014, is described by the museum itself as the world’s most complete stegosaur: virtually the entire animal survived, missing only one forelimb and the tip of the tail, from more than 300 bones. She lived around 150 million years ago, in the Jurassic, and was found on a Wyoming ranch in 2003. The purchase price was never disclosed publicly, funded by a private donation that let the museum acquire her in 2013.

Sophie Stegosaurus
APK, CC BY 4.0, via Wikimedia Commons

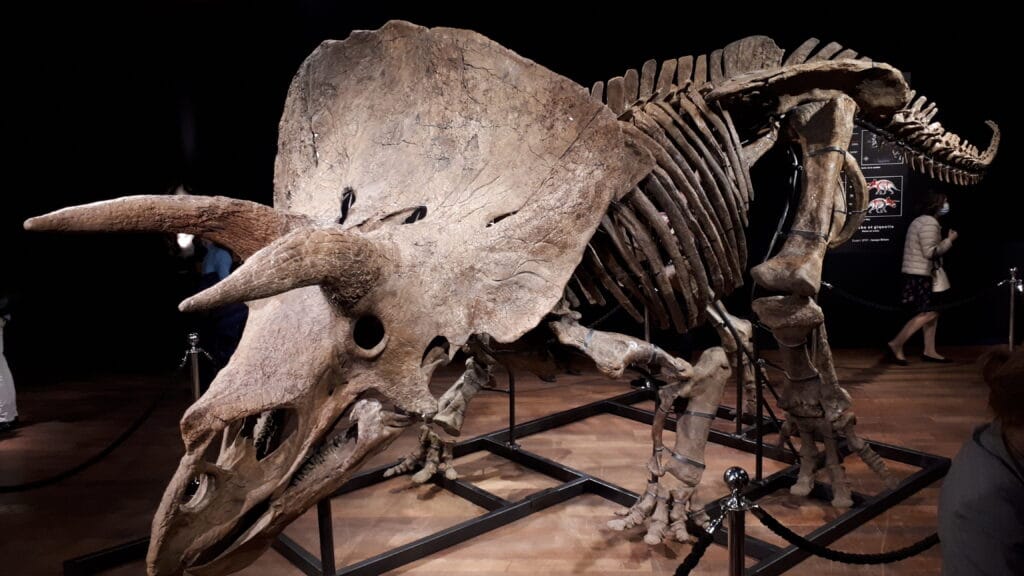
Big John, a Triceratops horridus unearthed in South Dakota in 2014, is the largest Triceratops skeleton ever found, with a body around 60 percent complete and a skull that is 75 percent complete. After selling for $7.7 million at a Paris auction in 2021, Big John went on public display in 2023 at the Glazer Children’s Museum in Tampa, Florida, where he remains on loan.

Big John Triceratops
Eviatar Bach, CC BY-SA 4.0, via Wikimedia Commons

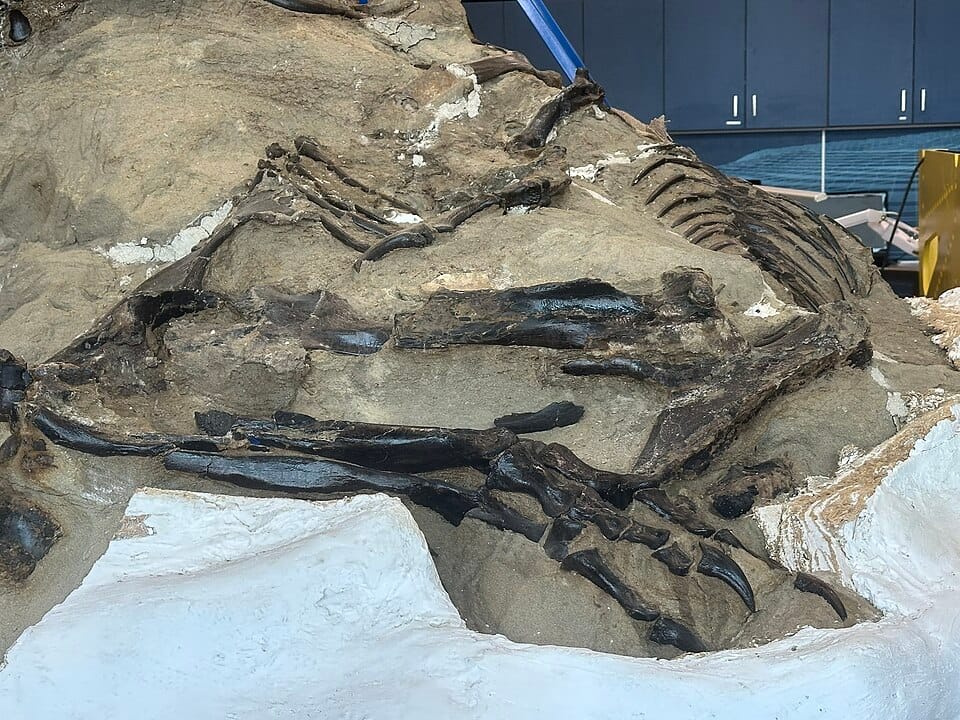
The most scientifically dramatic case may be the so-called Dueling Dinosaurs, two animals found locked together in Montana in 2006: a Triceratops (named Murphy), among the best preserved of its kind, and a small tyrannosaur (named Manteo) long assumed to be a juvenile T. rex. In 2025, researchers reclassified the predator as a fully grown Nanotyrannus lancensis, a distinct, smaller species, with a skeleton close to 100 percent complete, skin impressions included. The fossils failed to sell at a 2013 auction, where bidding stalled at $5.5 million against a $9 million estimate, before a non-profit support group bought them privately in 2020, for an undisclosed sum, and donated them to the museum. Both animals went on public display in 2024 at the North Carolina Museum of Natural Sciences in Raleigh.

Duelling dinosaurs
Geekgecko, CC BY 4.0, via Wikimedia Commons

Fossils Preserved With Skin and Feathers

A handful of fossils go further than complete bones, preserving traces of the animal’s actual body.

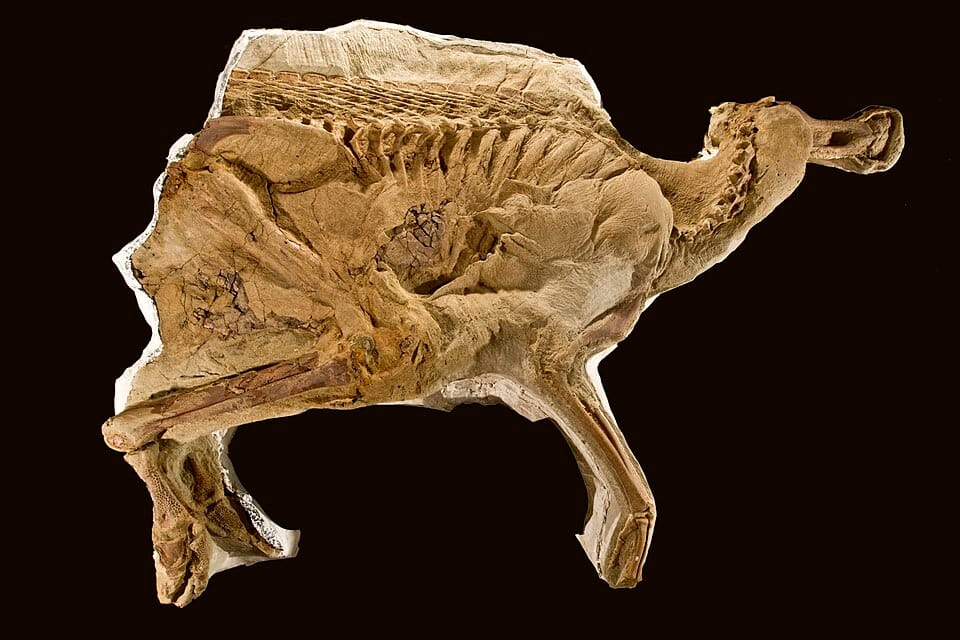
Leonardo, a Brachylophosaurus discovered in Phillips County, Montana, in 2000, is often called a dinosaur “mummy”: over 90 percent of its body is covered in fossilised skin impressions, along with traces of its final meal and internal organs. It is one of the best-preserved dinosaurs ever found, of any species. The original fossil is currently on loan to the Fukui Prefectural Dinosaur Museum in Japan, while a full-scale replica remains at the Great Plains Dinosaur Museum in Malta, Montana.

Leonardo Brachylophosaurus
The Children’s Museum of Indianapolis, CC BY-SA 3.0, via Wikimedia Commons

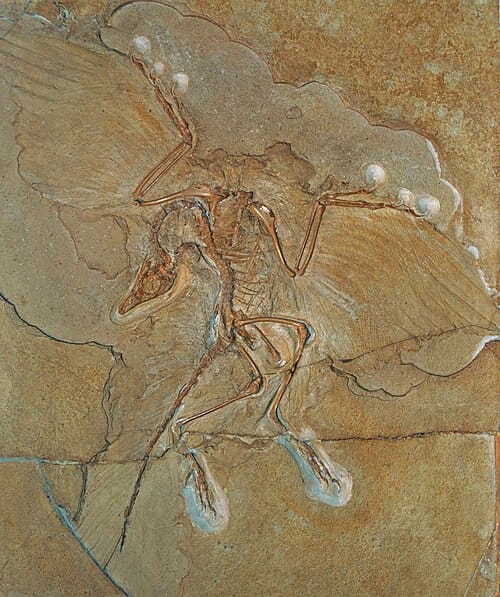
The Berlin specimen of Archaeopteryx, arguably the single most famous fossil in the world, shows something even rarer: clear impressions of feathers surrounding a skeleton that links reptiles to birds. Discovered in Bavaria and dated to around 150 million years ago, it is the most complete of the dozen or so Archaeopteryx fossils known and has been on display at the Museum für Naturkunde in Berlin, Germany, since the late 19th century.

Berlin Archaeopteryx
Emily Willoughby (emily.a.willoughby@gmail.com), CC BY-SA 4.0, via Wikimedia Commons

More Record-Breaking Skeletons

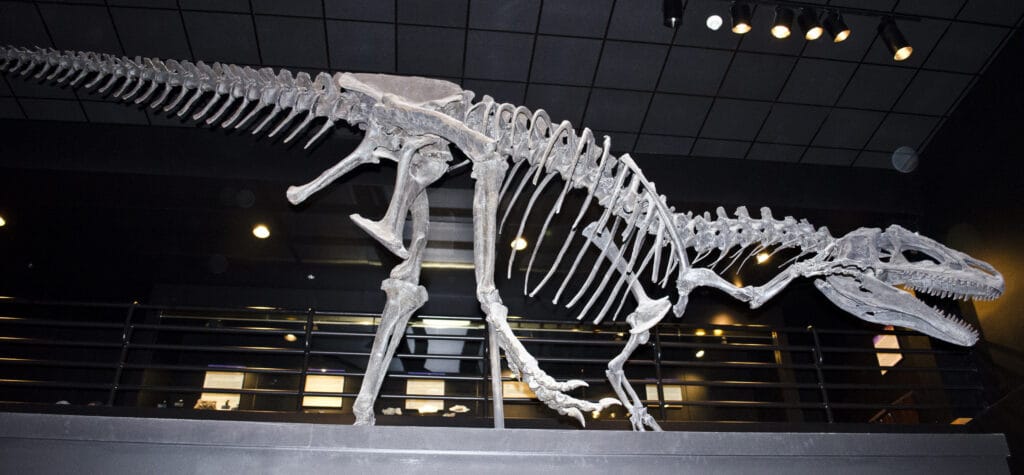
Big Al, an Allosaurus found near Shell, Wyoming, in 1991, is about 95 percent complete, making it one of the most complete large theropod skeletons ever recovered anywhere. Around 152 million years old, Big Al’s bones show numerous healed injuries, suggesting a hard life rather than a peaceful one. The original fossil belongs to the Museum of the Rockies in Bozeman, Montana.

Tim Evanson from Washington, D.C., United States of America, CC BY-SA 2.0, via Wikimedia Commons

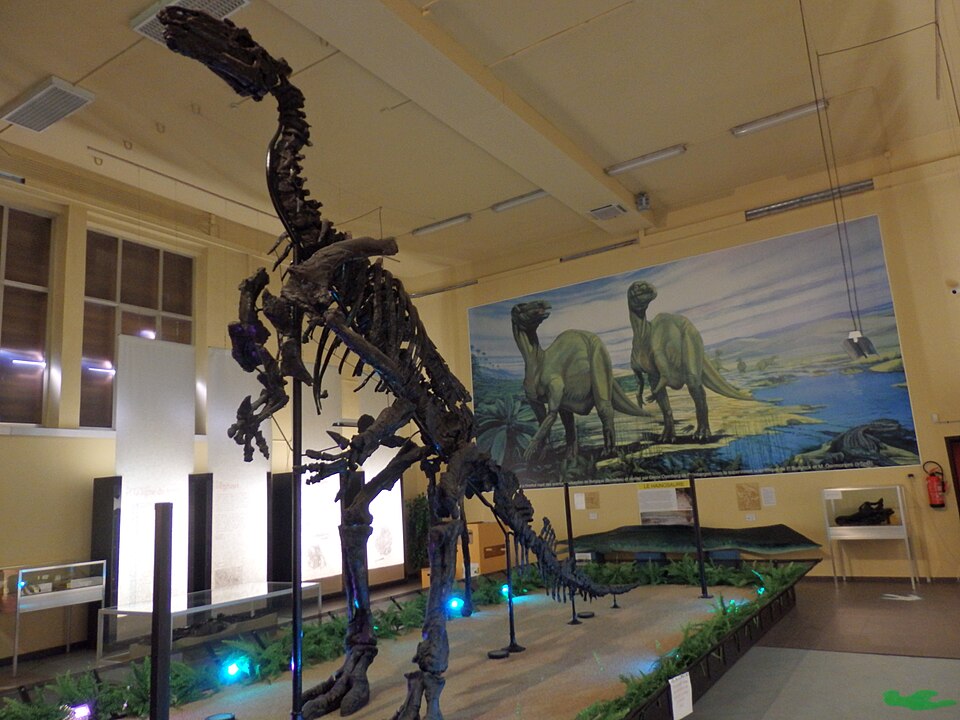
Long before any of these individual celebrity skeletons, the Bernissart Iguanodons set the standard for what a complete dinosaur fossil could look like. In 1878, coal miners in Bernissart, Belgium, struck an extraordinary deposit some 322 metres underground: around 30 relatively complete Iguanodon skeletons, many found still articulated in their original positions. Nine of them, mounted upright exactly as they were discovered, have been on display at the Institute of Natural Sciences in Brussels since 1882.

Bernissart Iguanodons
By Ronny Mg – Eigen foto, genomen in Le Musée de l’Iguanodon te Bernissart, CC0

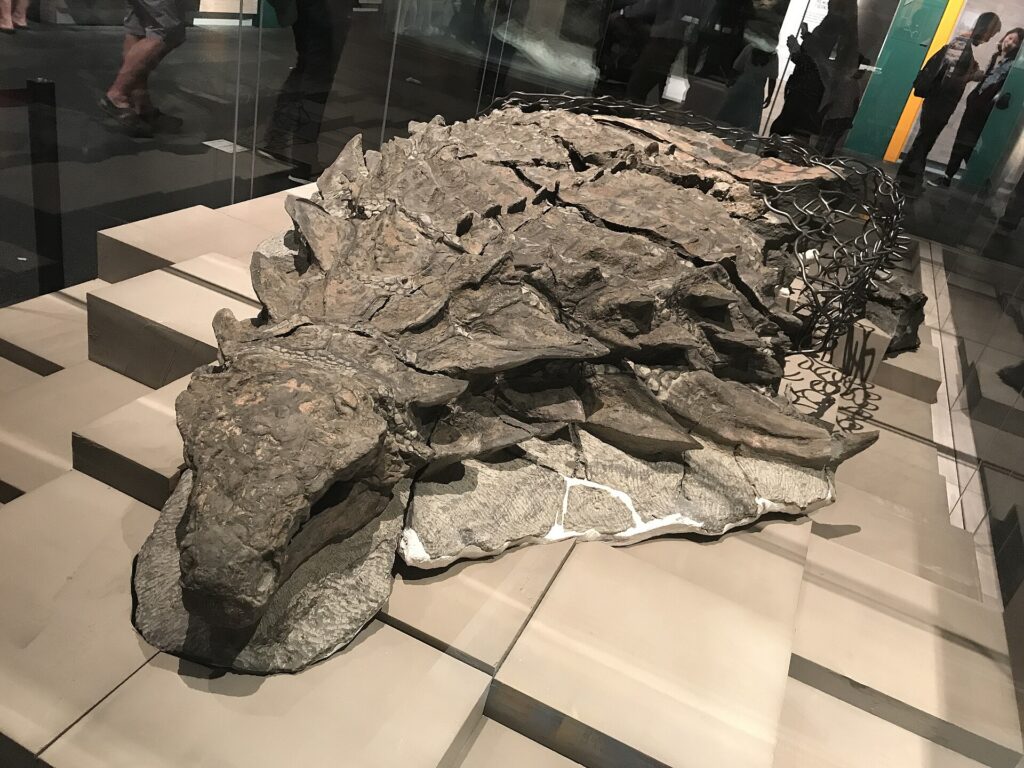
Often called the world’s best-preserved armoured dinosaur, the Nodosaur, formally named Borealopelta markmitchelli, looks less like a fossil than a petrified animal. It was uncovered by chance in 2011 by a heavy-equipment operator at an oil sands mine north of Fort McMurray, in Alberta, Canada, and dates to around 110 million years ago. What sets it apart is not completeness of the skeleton but the survival of its actual body: fossilised skin, intact armour plates and even traces of the reddish-brown pigment pheomelanin, which let scientists reconstruct the animal’s camouflage pattern almost 110 million years after it died. A technician spent over 7,000 hours across nearly six years freeing it from rock, work that alone earned the specimen part of its name. It has been on permanent display at the Royal Tyrrell Museum in Drumheller, Alberta, since 2017.

Borealopelta markmitchelli
ケラトプスユウタ, CC BY-SA 4.0, via Wikimedia Commons

Seeing Them for Yourself

Unlike a natural wonder tied to a season, these fossils can be visited year-round, since each is the anchor exhibit of its museum. Sue draws crowds at the Field Museum in Chicago, Stan can now be seen at the Natural History Museum Abu Dhabi, Trix has a permanent home at Naturalis in Leiden, and Scotty holds court at the Royal Saskatchewan Museum in Regina. Sophie greets visitors at London’s Natural History Museum, Big John is on loan to the Glazer Children’s Museum in Tampa, and the Dueling Dinosaurs can be watched still being prepared, bone by bone, at the North Carolina Museum of Natural Sciences in Raleigh. Leonardo’s replica is at the Great Plains Dinosaur Museum in Malta, Big Al belongs to the Museum of the Rockies in Bozeman, the Berlin Archaeopteryx is at the Museum für Naturkunde, and the Bernissart Iguanodons still stand exactly as they were mounted in 1882 at the Institute of Natural Sciences in Brussels.

Each of these skeletons is a rare case where the fossil record kept far more than the usual scattering of bones, enough for scientists, and visitors, to look a dinosaur almost completely in the eye.

Manaslu Circuit Trek with Tsum Valley: A Deeper Journey Through Nepal’s Himalayas

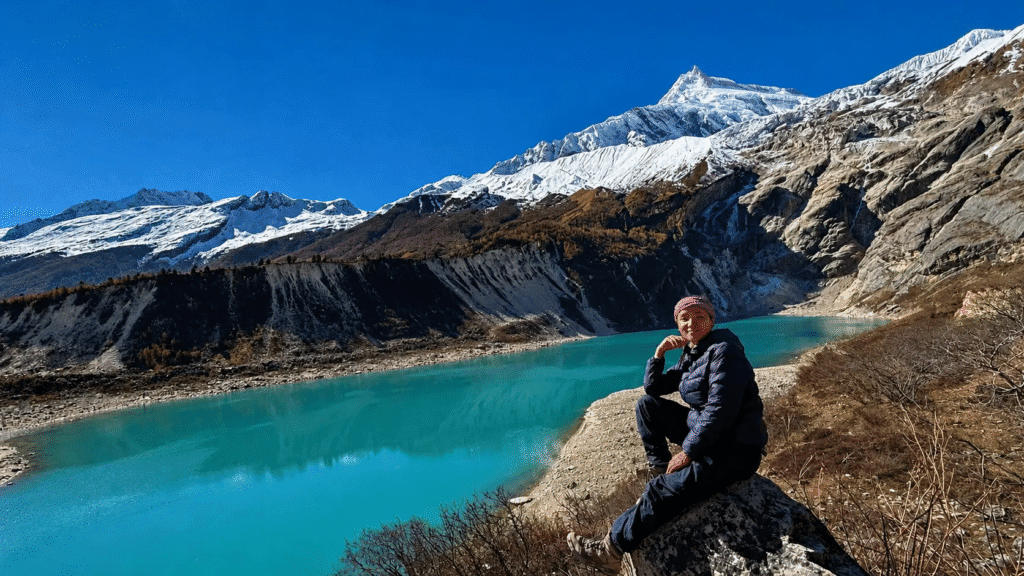
Manaslu Circuit Trek

Ask around in Kathmandu’s trekking shops and you’ll hear the same line more than once: Manaslu is what Annapurna used to be. Quieter trails, fewer lodges packed with tour groups, and a landscape that still feels like it belongs to the people who live there rather than to the trekking industry. The Manaslu Circuit Trek has built that reputation fairly. But most people who do the standard circuit never see the part of the region that arguably matters most — the Tsum Valley, a side valley tucked against the Tibetan border that the main trail simply walks past.

Add it in, and you get the Manaslu Tsum Valley trek — a longer, harder, and honestly more interesting version of the same journey. You still get the river gorges, the pine forests, the slow climb toward Mount Manaslu, and the grind over Larkya La. But you also get monasteries that see maybe a handful of foreign visitors a week, villages where Tibetan Buddhist tradition never really faded, and a few extra days where the trail isn’t trying to get you anywhere fast. It’s not for everyone. It asks more of your schedule, your legs, and your patience with basic lodges. But for trekkers who want the mountains and the culture, not just one or the other, it’s worth the extra time.

In short: the Manaslu Circuit with Tsum Valley links the classic Manaslu route with a detour into the remote Tsum Valley before rejoining the main trail and crossing the Larkya La Pass into the Annapurna region.

What Makes the Manaslu Circuit with Tsum Valley Different?

The route itself tells you a lot. You start at the roadhead near Machha Khola, follow the Budhi Gandaki river through Jagat and Philim, and then instead of continuing straight up the main valley, you branch off toward Tsum. After a handful of days exploring that side valley — as far as Mu Gompa if time allows — you double back down and rejoin the standard Manaslu trail, picking up the climb through Samagaon, Samdo, and eventually the pass.

What this does, practically, is stretch the trek from a single-track mountain crossing into something with two distinct characters. The Tsum section is slow and cultural — mani walls, chortens, monasteries built into hillsides, farming villages that still run on old rhythms. The main circuit, once you’re past the Tsum junction, turns into a proper high-altitude trek with Manaslu’s ice faces looming over the trail. Combining the two means you’re not just chasing a mountain pass for two weeks; you’re getting the full range of what the Manaslu Conservation Area actually protects, both the ecology and the culture.

Tsum Valley — The Cultural Heart of the Journey

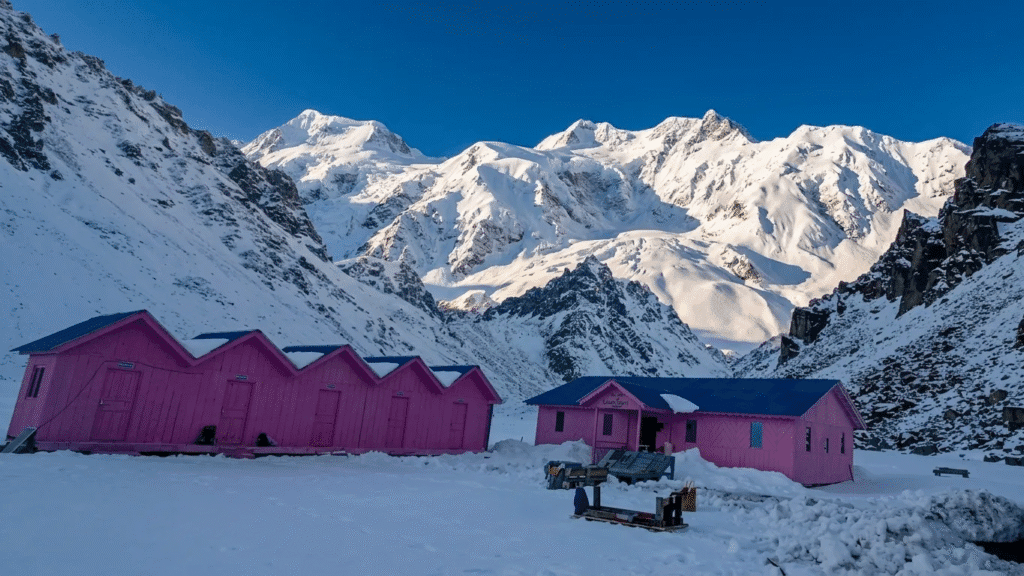
Manaslu Circuit Trek

If the main Manaslu trail is about scenery, Tsum Valley is about people and place in a way that’s hard to put into words until you’re actually there. It’s a Tibetan Buddhist enclave that was closed to outsiders until fairly recently, and it still carries that sense of separateness. The villages are built from stone, the fields are terraced into impossible angles, and the monasteries — some centuries old — sit like they’ve grown out of the hillside rather than been built on it.

What Trekkers Should Expect in Tsum Valley

Don’t go expecting Annapurna-style comfort. Accommodation is basic — simple rooms, shared bathrooms in most places, and meals that stick to what’s locally available rather than a long menu. Wi-Fi is patchy at best and disappears entirely in some villages. Days are long, and there’s less of the constant lodge-to-lodge rhythm you get on busier trails; sometimes you’ll walk for hours between one settlement and the next. That’s part of the appeal, honestly. Chumling and Chhokhangparo make good stopping points on the way in, and Mu Gompa, sitting near the head of the valley, is about as far into the Himalayas as most people will ever walk. This is really where the Manaslu Tsum Valley trek earns its name — it’s the section that changes the whole feel of the trip from “trekking route” to something closer to a cultural pilgrimage.

The Manaslu Circuit: From River Valleys to High Mountains

Once you’ve looped back out of Tsum and rejoined the main trail, the trek shifts gears completely. The lower stretches near Jagat and Philim run through dense forest and steep river gorges, with suspension bridges that sway more than you’d like and villages that still show heavy Tibetan influence in their architecture and dress. As you climb, the forest thins, the air gets noticeably thinner, and Mount Manaslu — at 8,163 meters, the eighth-highest peak on earth — starts dominating the skyline rather than just peeking through gaps in the ridgeline.

The High-Altitude Section

Samagaon is where the trek starts to feel serious. It’s the main acclimatization stop, and most itineraries build in a full rest day here before pushing on to Samdo and then the high camps below Larkya La. This last stretch is no joke — long summit-day-style walking, cold starts, and weather that can flip from clear skies to whiteout conditions faster than you’d expect. Don’t underestimate the pass. Start early, keep a steady pace rather than rushing, and lean on your guide’s judgment if the weather turns. Speed matters far less here than simply getting the timing and the pacing right.

Acclimatization and Altitude: Where Good Planning Matters

Altitude starts becoming a real factor from Samagaon upward, and this is genuinely where treks go wrong if people rush it. Rest days aren’t wasted days — they’re part of the itinerary, not an optional extra you skip if you’re feeling strong. Walk slower than feels natural once you’re above 3,500 meters or so. Drink more water than you think you need, eat properly even when appetite drops, and pay attention to how you’re actually feeling rather than how far you’d like to get that day.

It’s worth knowing the difference between normal trekking tiredness and the early signs of acute mountain sickness — persistent headache, nausea, or unusual breathlessness at rest are not things to push through. A slower trekking day is far better than turning a manageable altitude problem into an evacuation.

Permits, Guide Requirements and Route Planning

This isn’t a route where you can just show up and start walking. Manaslu is a restricted area, which means you’ll need a Manaslu restricted area permit alongside the Manaslu Conservation Area Permit (MCAP), and if you’re adding the valley detour, a separate Tsum Valley permit as well. Rules around group size, guide requirements, and permit costs shift from time to time, so it’s worth double-checking the current requirements close to your departure date rather than relying on older information floating around online.

This also isn’t the kind of trail where an independent, no-guide setup works the way it might on more open routes like Annapurna. If you’re trying to figure out current permit rules or how to put together a sensible route and guide arrangement, talking to a locally based operator like Nepal Independent Guide can save a fair bit of confusion before you even land in Kathmandu.

How Difficult Is the Manaslu Tsum Valley Trek?

Honestly? It’s demanding. Not technically difficult in a mountaineering sense, but long — you’re looking at consecutive days of walking, steep ascents and descents through the lower gorges, then sustained altitude exposure heading into the pass. Add remote terrain, basic accommodation, and unpredictable mountain weather, and it adds up to a serious trek rather than a casual walk.

Who Is It Suitable For?

Experienced hikers will find it manageable without much extra prep. Fit first-timers can handle it too, provided they take the acclimatization schedule seriously and don’t try to compress the itinerary. It suits people who don’t mind walking several days in a row and who care as much about the villages and monasteries as the mountain views. It’s a poor fit for anyone expecting hot showers and reliable Wi-Fi throughout, or unwilling to slow down when altitude demands it.

Best Time to Walk This Route

Autumn (roughly September through November) tends to bring the most stable weather and the clearest mountain views, which is why it’s the busiest season on the trail. Spring (March to May) runs a close second — milder temperatures at lower elevations and decent visibility higher up, sometimes with rhododendrons in bloom on the lower sections. Winter is possible but tough; Larkya La can become genuinely difficult in heavy snow, and some teahouses scale back services. Monsoon season, June through August, is generally best avoided — rain, mud, and landslide risk make the lower valley sections miserable and the higher trail conditions unreliable. For most trekkers, spring and autumn remain the easiest windows to plan around, though it’s always worth checking conditions closer to departure.

Accommodation, Food and Daily Trail Life

Teahouses along the route are simple — basic rooms, shared bathrooms in many places, and menus built around dal bhat, noodle soups, rice dishes, and whatever vegetables are available locally. Choices narrow the higher you climb, and prices creep up too, since everything has to be carried in. Carry some extra snacks for the longer or more remote days, particularly if you’ve got dietary restrictions the local menus won’t cover. Charging points, mobile signal, and hot showers exist in places, but don’t count on them everywhere — especially once you’re deep into Tsum Valley or above Samagaon.

A Practical Route Strategy

Rather than locking into a rigid day-by-day plan, it’s more useful to think of the trek in blocks: Kathmandu to the roadhead, the lower Budhi Gandaki approach, the Tsum Valley detour, the return to the main trail, the climb through Samagaon and Samdo, the Larkya La crossing, and the descent into Dharapani. How many days each block takes depends on your fitness, how much time you want in Tsum, acclimatization needs, and road conditions on the approach — which can vary more than you’d expect on this route.

What to Pack for the Manaslu Tsum Valley Route

Keep it practical: broken-in trekking boots, warm layers for cold nights, a decent waterproof shell, a sleeping bag rated for genuinely cold conditions, a headlamp, a reliable water bottle or hydration system with a purification method, sun protection, basic first aid and any personal medication, trekking poles, a power bank, snacks, and your permit documents kept somewhere dry and accessible. Pack for changing conditions rather than for how warm it feels in Kathmandu — the temperature swing between the lowlands and the pass is bigger than most first-timers expect.

Responsible Trekking in the Manaslu Region

This region holds onto its character partly because it hasn’t been overrun, and that’s worth protecting. Ask before photographing people, respect monastery rules and quiet hours, and avoid leaving plastic waste in villages that have no real way to deal with it. Stick to established trails, refill water rather than buying bottled where possible, and support the local teahouses rather than treating remote villages as scenery. None of this is complicated, but it makes a real difference to the places you’re passing through.

Final Thought — More Than a Mountain Circuit

The Manaslu Circuit Trek gives you the physical challenge — the long climb, the thin air, the crossing of one of Nepal’s major Himalayan passes. Tsum Valley gives you something quieter: monasteries built into hillsides, village life that hasn’t changed much in generations, and a few days away from the busier trekking corridors. Together, they make a trek that’s less about ticking off a summit and more about the whole journey getting there.

If this is the kind of trek you’re considering, don’t plan it around a checklist alone. Build in enough days for acclimatization, understand the current permit requirements, prepare for basic mountain conditions, and work with an experienced local trekking professional who actually knows the route. That kind of preparation is what turns a difficult Himalayan journey into a genuinely rewarding one.

Frequently Asked Questions About the Manaslu Tsum Valley Trek

1. How long does the Manaslu Circuit with Tsum Valley take? 

It depends on your itinerary and acclimatization schedule, but combining both sections generally takes noticeably longer than the standard Manaslu Circuit alone.

2. Is the Manaslu Tsum Valley trek difficult? 

Yes. Long walking days, remote terrain, altitude, and the Larkya La crossing all add up to a genuinely demanding Himalayan trek.

3. Do I need a guide for the Manaslu Circuit? 

Manaslu is a restricted area, so check current regulations before departure — guide arrangements and permits typically need to be organized in advance.

4. What is the highest point of the trek? 

Larkya La Pass, at around 5,106 meters (16,752 feet), is the highest point on the standard Manaslu Circuit route.

5. Is Tsum Valley worth adding to the Manaslu Circuit? 

For anyone drawn to culture, quieter villages, and a longer Himalayan experience — yes. It adds a dimension the standard circuit simply doesn’t have.

6. What is the best season for the trek? 

Spring and autumn are generally the most favorable, though high-pass weather conditions should always be checked close to your departure date.

-sponsored-